Sunday, 6 December 2015

Games Production - Milestone 2, Early Gameplay Prototype

In order to try and understand how Unity's NavMesh system works, I created a basic scene in which I created a basic player controller and enemy controller.

In this scene, the player character (grey ball) moves to whatever point the player clicks on. If the enemies (green balls) have line of sight with the player, the enemies will move towards the player. If their line of sight with the player is obstructed, then they will move to whatever point they last line of sight with the player. They remain there until line of sight with the player is once again achieved.

When the enemies come within a short distance of you, then they enter an attack state. In this state, the enemies will turn a shade of red in order to signify to the player that they are attacking. If contact is made between an enemy and the player, then the player dies.


---------------------------------

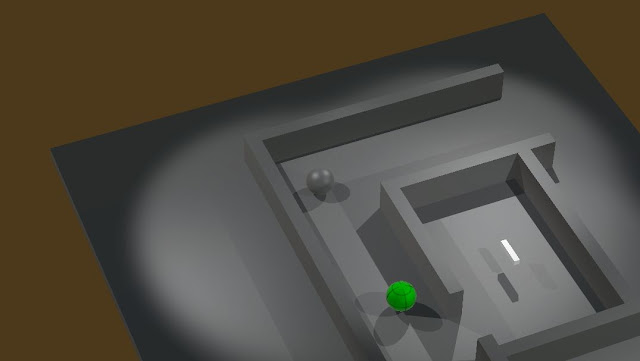
I created another scene where the player has the opportunity to kill the enemy. The white cuboid levitating in the room next to the player is a sword. If contact is made between the player and an enemy whilst the weapon is held, then the enemy dies. 

Currently, the weapon can only be used once. The weapon drops to the floor once it has been used.


Monday, 30 November 2015

Games Art - Baking Maps: Part 1

I have decided to create two separate texture sets for my model. One for the helmet and one for the body. This is so I don't have to work with a 8192x8192 Photoshop file that my computer wouldn't be able to handle. Even a 4096x4096 file nearly makes Photoshop crash on my computer, but editing two 4k textures is a lot more manageable than one 8k texture.

Currently, I have a fair amount of wasted texture space, which is mainly due to how I've unwrapped the bulk of the helmet (at the bottom). I could scale up the individual pieces to fill this space, but I would then have an inconsistent pixel density on my model. I also can't scale the pieces up uniformly without unwrapping the main bulk again with more seams, as it is already scaled as large as it can go (from edge to edge). I have chosen to keep this UV layout, and use some of the extra space for the body UVs if there are parts that can be easily separated.

I ran into a lot of issues trying to bake an ambient occlusion map. First was the issue of envelopes clipping and sampling an undesired surface. I was able to fix this on the normal map by doing each piece separately, but the ambient occlusion is reliant on the fact that all the pieces are done at the same and are in the correct positions. I needed the individual objects to occlude each other's ambient occlusion rays, but not the transfer rays from the envelopes to the target meshes. I solved this by baking an ambient occlusion directly onto my high poly model (using automatic UV unwrapping) and then transferring it to my low poly as a diffuse map. This meant I could each piece individually, as a diffuse transfer isn't dependent on each piece being done at the same time.


Monday, 2 November 2015

Sunday, 18 October 2015

Games Art - High Poly Asset: Part 1

For the high poly model I plan to make the majority of the shape in Maya, and then add the more organic elements in ZBrush (e.g., the bullet hole on the helmet, the folds in the clothing).


Below is the first 'iteration' I have created. It is the basic shape of the helmet. The proportions are still slightly inaccurate, there is no detail on the side panels and no smoothing.


First Iteration of the Helmet


Below is a slightly improved version. The dome of the helmet is a more accurate shape, and the whole model has been subdivided and smoothed. The side panels and antenna* are still only placeholder. The image was rendered with Mental Ray and has a three-point lighting setup.


Second Iteration of the Helmet


Below is the final version of the helmet I will continue to sculpt in ZBrush.


Final Helmet Model before ZBrush Sculpting


 *It's actually an 'External Targeting Rangefinder'. Since that's a lengthy term and most people mistake it for an antenna, I will simply refer to it as the 'antenna' for the purposes of this blog.

Games Art - AAA Game Asset


For this unit, we are tasked with modelling and texturing a AAA-quality game asset. I chose to create a Boba Fett bust similar to the one pictured below, as I believe the weathering on his helmet and armor will take advantage of a PBR texture setup.

Boba Fett bust


I have created a reference sheet that I can use in Maya to create the helmet. However, there are many different versions of Boba Fett's helmet with slight variations and I was unable to find perfect front side reference images, so I will not be following the reference exactly.

Helmet Reference Sheet